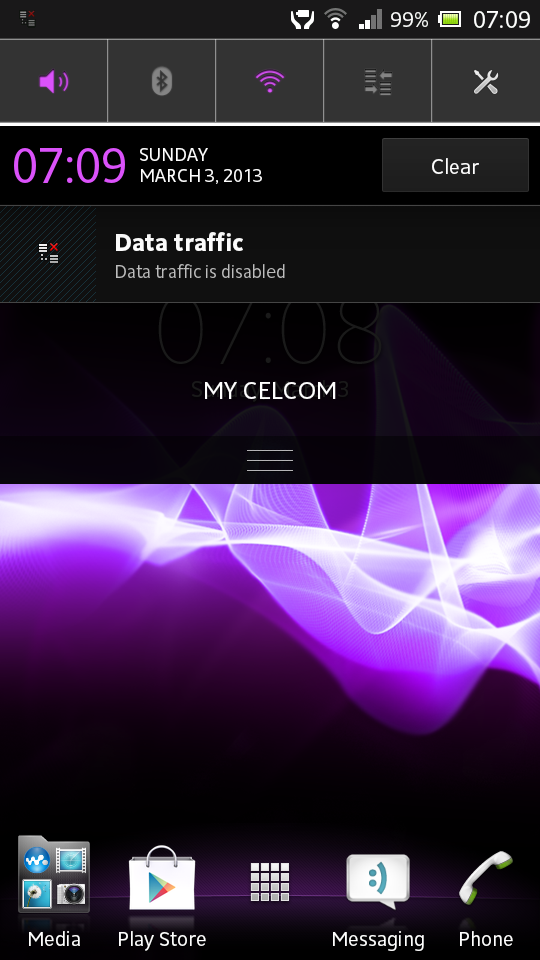
ប្រើប្រាស់ Mass Storage នៅលើទូរស័ព្ទ SONY
Mass Storage ប្រហែលជាអ្នកធ្លាប់ស្គាល់ហើយចំពោះទូរស័ព្ទកំរិតមធ្យមរបស់
Samsung ជំនាន់ Gingerbread ចុះក្រោមដែលប្រើប្រាស់ការផ្ទេរទិន្នន័យជា Mass
Storage ! សម្រាប់ទូរស័ព្ទកំរិតខ្ពស់ភាគច្រើនប្រើប្រាស់ជំនាន់ ICS
ឡើងទៅគឺប្រើប្រាស់ជា Media Transfer (MTP) លើកលែងតែទូរស័ព្ទ Google Nexus
ប៉ុណ្ណោះ!
MTP អនុញ្ញាតិអោយលោកអ្នកគ្រប់គ្រងទិន្នន័យលើទូរស័ព្ទទាំងស្រុងព្រមទាំងការផ្ទេរ និង បញ្ជូនទិន្នន័យតែមានសភាពយឺតជាង Mass Storage!
សម្រាប់ទូរស័ព្ទ SONY ក៏ដូចច្នេះដែរ Xperia 2011 ជំនាន់ GB ប្រើប្រាស់ជា
Mass Storage តែប្រសិនជាជំនាន់ ICS ឡើងសុទ្ធតែប្រើប្រាស់ជា MTP
ទាំងអស់រួមជាមួយ Xperia 2012 2013 ផងដែរ! តែអ្នកអភិវឌ្ឍន៍ក្នុងវេទិកា XDA-Developer បានបង្កើតកម្មវិធីមួយឈ្មោះថា SD Mounter
ដែលអាចបិទបើក
Mass Storage និង Media Transfer តាមតំរូវការរបស់អ្នក!
ហើយក្នុងពេលនេះអាចប្រើប្រាស់លើទូរស័ព្ទចំនួន 3 Model សិនប៉ុណ្ណោះដូចជា: Xperia S / Xperia P / Xperia U
តម្រូវការរបស់កម្មវិធី:
- ដំនើរការលើ ICS 4.0.4
-ទូរស័ព្ទបាន Rooted រួចរាល់ និង បានតម្លើង BusyBox
បញ្ជាក់:
មុនប្ដូរជាទម្រង់ MTP សូមបិទ Mass Storage នៅលើ PC ជាមុនសិន!
មុនប្ដូរជាទម្រង់ MTP សូមបិទ Mass Storage នៅលើ PC ជាមុនសិន!
ទាញយក:
[CWM & TWRP] តម្លើង Dual Recovery លើ Xperia Z / ZL (LB & UB)
ClockworkMod & TWRP
គឺមានមុខងារប្រហាក់ប្រហែលគ្នាដោយអនុញ្ញាតិអោយតម្លើង Rom ផ្សេងៗ
តែពេលនេះលោកអ្នកអាចតម្លើងទាំង២រួមគ្នាតែម្ដងគឺ CWM6 និង TWRP ដោយស្រង់ចេញពី
XDA-Developer!
តម្រូវការ:
- ទូរស័ព្ទ Xperia Z: SO-02E, C6602, C6603 និង Xperia ZL: C6502, C6503, C6506
- បាន Rooted រួចរាល់
តម្លើង:
ពន្លាឯកសារខាងលើរួចចុចយក SuperSU ឬ SuperUser តាមប្រភេទទូរស័ព្ទរបស់លោកអ្នក!
ពេលតម្លើងចប់ ចុច Vol+ សម្រាប់ ClockworkMod និង Vol- សម្រាប់ TWRP!
[Flashing Tool] FlashTool 0.9.11.0

Flashtool is a flashing software that can be used to :
- Flash original Images (Android 1.6, 2.1, 2.3 Images)
- Root your phone
- Install Recovery, Busybox, custom kernels
- Clean your Rom (remove /system/apps apps of your choice) (Be careful, unless you really know what you do, do not modify the default list. This can make your phone stuck at the SE Logo)
- Clear dalvik cache
- Optimize (install of JIT v2) (Disabled in 0.4, will readd it as a plugin for 2.1 phones only)
- Customize (installs apps found in the custom/apps folder of the flashtool)
- Clean uninstalled (remove any references to system apps removed in the Clean (root needed) step)
- Edit any text file on the device
- Rebrand your device
| Requirements | |
|---|---|
| Before downloading and even installing, disable your antivirus. The package is virus free. Antivirus complains about psneuter and zergRush root exploits and I still haven't found how to fool the antivirus. | |
| Installation of Flashtool | |
To install the Flashtool, follow the steps below:
| |
|
[3D Camera] SONY Xperia P Jelly Bean 4.1.2

បន្ទាប់ពីលោកអ្នកបន្ទាន់សម័យ Xperia P ទៅកាន់ Jelly Bean ប្រាកដជាគ្មាន 3D Camera ទៀតទេ
តែលោកអ្នកអាចចម្លង File ពី ICS ទៅJB ក៏អាចដំនើរការបានដូចគ្នា!
តម្រូវការចម្បង:
-ទូរស័ព្ទបាន Rooted
-មាន Root Explorer
១. ទាញយក
២. ចម្លង SemcCamera3D ទៅកាន់ /system/app និង ប្ដូរ permissions តាមរយៈ
Root Explorer
៣. Restart ជាការស្រេច
អត្ថបទពី: XDA-Developer.com


 នេះគឺជាកម្មវិធី Easy Touch ជាកម្មវិធីចម្លងចេញពី iDevice ដែលមានស្រាប់នៅលើ
iPhone iPod iPad ទាំងអស់ដែលដំនើរការលើ iOS 5 ឡើងទៅគឺ AssistiveTouch!
ចំណែក Android ក៏មានដែរគឺ Easy Touch
តែមិនមែនមានស្រាប់នោះទេគឺត្រូវតម្លើងបន្ថែមលើទូរស័ព្ទ
នេះគឺជាកម្មវិធី Easy Touch ជាកម្មវិធីចម្លងចេញពី iDevice ដែលមានស្រាប់នៅលើ
iPhone iPod iPad ទាំងអស់ដែលដំនើរការលើ iOS 5 ឡើងទៅគឺ AssistiveTouch!
ចំណែក Android ក៏មានដែរគឺ Easy Touch
តែមិនមែនមានស្រាប់នោះទេគឺត្រូវតម្លើងបន្ថែមលើទូរស័ព្ទ
មុខងារសំខាន់ៗ Easy Touch:
★ Open your favour app.
★ Go to Home Screen.
★ Back button(need Root support).
★ Menu button(need Root support).
★ Lock Screen(sorry for some problems on Galaxy s3 and some 4.0.+ Android OS).
★ App list.
★ Open recent task(double press).
★ Task manager(Kill task,need Root support)
★ Memory optimize(Ram optimize)
★ Time display
★ Clean cache
តែការនាំយកមកបង្ហាញជូននេះគឺ Easy Touch បកប្រែជាភាសាខ្មែរ!
បញ្ជាក់: ការបកប្រែអាចខុសឆ្គង ព្រោះបកប្រែជាលក្ខណៈបុគ្គលប៉ុណ្ណោះ!

នេះគឺជាកម្មវិធី Flash Alert ដែលមានតួនាទីអាចផ្ដល់ដំណឹងរាល់ពេលទទួលការហៅចូល និង ទទួលសារដោយភ្លើង LED! ដោយពេលនេះបានបកប្រែជាភាសាខ្មែរសាកល្បង!
បញ្ជាក់: សម្រាប់តែទូរស័ព្ទមាន Flash Camera ប៉ុណ្ណោះ!


 នេះគឺជាក្ដារចុចអក្សរខ្មែរដែលបានកែប្រែចេញពី Multiling O Keyboard (Beta) មើលទៅស្រស់ស្អាតជាង Multiling Keyboard បន្តិច!
លោកអ្នកអាចសាកល្បងជាមួយក្ដារចុចនេះបាននៅលើទូរស័ព្ទដំនើរការដោយ Android គ្រប់ប្រភេទដែលស្គាល់ពុម្ពអក្សរខ្មែរយូនីកូដពេញលេញ!
ហើយមិនត្រឹមតែអាចសរសេខ្មែរ និង អង់គ្លេសនោះទេនៅមានច្រើនភាសាទៀតដែលអាចសរសេរ
បានដូចជា: ថៃ ចិន ជប៉ុន កូរ៉េ....! តែក៏ត្រូវទាញយក Plugin របស់ភាសាទាំងនោះមកលើទូរស័ព្ទ
ផងដែរ តាមរយៈ Play Store!
Mac OS X

Easy Touch សម្រាប់ Android ជាភាសាខ្មែរ
មុខងារសំខាន់ៗ Easy Touch:
★ Open your favour app.
★ Go to Home Screen.
★ Back button(need Root support).
★ Menu button(need Root support).
★ Lock Screen(sorry for some problems on Galaxy s3 and some 4.0.+ Android OS).
★ App list.
★ Open recent task(double press).
★ Task manager(Kill task,need Root support)
★ Memory optimize(Ram optimize)
★ Time display
★ Clean cache
តែការនាំយកមកបង្ហាញជូននេះគឺ Easy Touch បកប្រែជាភាសាខ្មែរ!
បញ្ជាក់: ការបកប្រែអាចខុសឆ្គង ព្រោះបកប្រែជាលក្ខណៈបុគ្គលប៉ុណ្ណោះ!
ទាញយក
កម្មវិធី Flash Alert ជាភាសាខ្មែរសម្រាប់ Android
នេះគឺជាកម្មវិធី Flash Alert ដែលមានតួនាទីអាចផ្ដល់ដំណឹងរាល់ពេលទទួលការហៅចូល និង ទទួលសារដោយភ្លើង LED! ដោយពេលនេះបានបកប្រែជាភាសាខ្មែរសាកល្បង!
បញ្ជាក់: សម្រាប់តែទូរស័ព្ទមាន Flash Camera ប៉ុណ្ណោះ!
ទាញយក
[ប្រភេទសាកល្បង] ក្ដារចុចអក្សរខ្មែរសម្រាប់ប្រព័ន្ធប្រតិបត្តិការ Android
លោកអ្នកអាចសាកល្បងជាមួយក្ដារចុចនេះបាននៅលើទូរស័ព្ទដំនើរការដោយ Android គ្រប់ប្រភេទដែលស្គាល់ពុម្ពអក្សរខ្មែរយូនីកូដពេញលេញ!
ហើយមិនត្រឹមតែអាចសរសេខ្មែរ និង អង់គ្លេសនោះទេនៅមានច្រើនភាសាទៀតដែលអាចសរសេរ
បានដូចជា: ថៃ ចិន ជប៉ុន កូរ៉េ....! តែក៏ត្រូវទាញយក Plugin របស់ភាសាទាំងនោះមកលើទូរស័ព្ទ
ផងដែរ តាមរយៈ Play Store!
Flashtool Version 0.9.10.2 Beta6 (Windows / Linux / Mac)
FlashTool Beta Version For Xperia Z/ZL:
-Flashing
-Unlock Bootloader
-Relock Bootloader
-More
Download:
[Hard-Reset] LG Optimus Vu (F100L / F100S / P895)
1. Power Off
2. Press and Hold Volume Down + Power
3. Waiting To Confirm Hard-Reset
4. Press Power 2 Time To Confirm Hard-Reset
All Data The Phone Will Be Format!
មិនទទួលខុសត្រូវរាល់បញ្ហាដែលកើតឡើងណាមួយ! (Bricked)


 កម្មវិធីនេះគាំទ្រជំនាន់ Android V2.0 ឡើងទៅ។ ដើម្បីទាញយក CamScanner
សូមចុចត្រង់នេះ …
២) Document Scanner (3.2MB)៖ មិនត្រឹមតែមានមុខងារបម្លែងជា PDF បាននោះទេ តែថែមទាំងអាចឱ្យគេ upload ចូលទៅ Google Docs, DropBox និង Box.net បានទៀតផង។ វាអាចស្កេនជាឯកសារ PDF បានច្រើនទំព័រជាប់គ្នា។ កម្មវិធីនេះក៏អាចឱ្យគេជ្រើសរើសប្រភេទក្រដាស និងកម្រិតគុណភាពរូបបានផងដែរ។
លក្ខណៈពិសេសទៀតនោះ Document Scanner អាចឱ្យយើងទាញយករូបពី Gallery មកធ្វើជាឯកសារ PDF ជាខ្សែ ឬយកមកផ្គុំបន្ថែមជាមួយកាមេរ៉ាថតរូបបានទៀតផង។ ក្រោយពីបម្លែងទៅជា PDF file រួចហើយវាមានទីតាំងនៅក្នុងមេម៉ូរីម៉ាស៊ីនក្នុងថតឯកសារឈ្មោះថា “document-scanner-files“។
 កម្មវិធីនេះគាំទ្រជំនាន់ Android V1.65 ឡើងទៅ។ ដើម្បីទាញយក Document Scanner
សូមចុចត្រង់នេះ …
៣) Droid Scan Lite (ទំហំ 777KB)៖ មានលក្ខណៈដូចគ្នានឹងកម្មវិធីខាងលើ គឺអាចបម្លែងរូបភាពក្នុង Gallery និងរូបថតពីកាមេរ៉ាបានដូចគ្នា។ ឯកសារក្រោយពីបម្លែងរួចមានទីតាំងស្ថិតនៅមេម៉ូរីម៉ាស៊ីន ថតឯកសារឈ្មោះ “Droid Scan Extras“។
 កម្មវិធីនេះគាំទ្រជំនាន់ Android V1.6 ឡើងទៅ។ ដើម្បីទាញយក Droid Scan Lite
សូមចុចត្រង់នេះ …
៤) Scan to PDF (ទំហំ 1.2MB)៖ មុខងារ ដូចគ្នាដែរ គឺអាចថតរូបរួចបម្លែងជា PDF និងអាចយករូបភាពពី Gallery មកបម្លែងបាន។ ក្រោយពីបម្លែងរួច វាផ្ទុកនៅទីតាំងស្ថិតក្នុងមេម៉ូរីម៉ាស៊ីន និងមាននៅក្នុងថតឯកសារឈ្មោះថា “ScanToPDF_Free”។
 កម្មវិធីនេះគាំទ្រជំនាន់ Android V2.0 ឡើងទៅ។ ដើម្បីទាញយក Scan to PDF
សូមចុចត្រង់នេះ …
៥) ConvertToPDF Lite Version (ទំហំ 852KB)៖ មុខងារអាចស្កេនឯកសាររូបថតជា PDF និងបន្តគ្នាច្រើនទំព័របាន។ ក្រោយពីបម្លែងរួចហើយវាមានទីតាំងស្ថិតនៅមេម៉ូរីម៉ាស៊ីន និងនៅថតឯកសារ Android → data → br.com.tablet…converttopdf → file រួចមើលឈ្មោះឯកសារដែលយើងបានកំណត់។
 កម្មវិធីនេះគាំទ្រជំនាន់ Android V2.3 ឡើងទៅ។ ដើម្បីទាញយក ConvertToPDF Lite Version
សូមចុចត្រង់នេះ …
RECOVERY
USER DATA
CDMA MODEM
LTE_MODEM
LTE_MODEM2
CACHE
BOOT
How to package into a flashable ODIN package:
From a terminal command line:
Add any combination of image files you want after the "-c" and before the ">"
Make sure each .IMG file has a space between the next one.
DISCLAIMERS
1. I am not responsible if you brick your phone using these system dumps.
2. Do not monkey around with BOOT or MODEMS unless you are really sure what you are doing
3. Always make sure you package your ODIN bundles with a .Md5 checksum to prevent corrupted data dumps from screwing your phone up.
4. Stay away from flashing .tar only files as these will flash no matter what and have no error checking
5. If you plan to package ODIN bundles for distribution of your ROM, only package SYSTEM, RECOVERY, etc etc. Do not package USER DATA or CACHE for distrobution as this could contain your personal information. Only package CACHE and USER DATA if this is a personal backup or you know what you are doing.
6. Flashing ODIN packages without a samsung signature will increase your flash counter. The refurbishing companies that work with AT&T, Verizon, and T-mobile all use the same company in coppell TX and they do not check for the flash counter. Only Samsung does. Most phones are disassembled before they even go to Samsung and once the phone makes it there they bill the carrier back for the phone and not the customer. (Trust me, I run a warranty center for one of the big 4 carriers) This comes directly from senior personnell from Samsung.


របៀបធ្វើ(Linux):
របៀបធ្វើ(Windows)
1) Navigate to your cygwin directory (ex: C:\cygwin) and go to C:\YOUR_CYGWIN_DIRCECTORY\home\Owner\ and create a folder, name it to whatever you'd like (ex: recovery_odin)
2) Download your CWM recovery image and rename it to recovery.img. Place it in the folder you created in cygwin (for the rest of the guide I'll refeer to this folder as recovery_odin)
3) Double click on your cygwin.bat and type this:
4) Enter the following commands:

TEST MODE CODE:


By Jay Rong in Android Heart [ ខ្មែរជួយខ្មែរ ]
First you need to update your Device to 4.0.4 or Jelly Bean 4.1.1. Please follow this link
http://www.elunchen.com/2012/09/upgrade-samsung-galaxy-s-gt-i9000-to.html
អ្វីដែលអ្នកត្រូវការគឺ
មុននឹងធ្វើអ្នកត្រូវចំលង nks_ics_kh_v1.zip ទៅក្នុង Internal SDcard ជាមុនសិន (អ្នកអាចចំលងទៅ External ក៏បាន)
ដោយ:Jay Rong
[Hard-Reset] Huawei Ascend P2
1. Power Off Your Phone (Press And Hold Volume Up + Volume Down + Power)
2. With Phone Turned Off (Press And Hold Volume Up + Send + Power) Will Boot To Recovery Mode
3. From Recovery Mode Menu > Wipe Data / Factory Reset > Yes -Delete All User Data តម្លើង Facebook Home នៅលើ Android (Root និង មិនRoot)
-ទូរស័ព្ទមួយចំនួនគឺមាន Facebook ស្រាប់ភ្ជាប់មកជាមួយនៅក្នុង System យើងត្រូវការ Root ដើម្បីតម្លើង ដូចជា SONY... ជាដើម
-ទូរស័ព្ទមិនមាន Facebook ភ្ជាប់មកជាមួយមិនត្រូវការ Root នោះទេ គឺតម្លើងយកតែម្ដង ដូចជា
Samsung LG...
វិធីតម្លើង:
1.សូមលុបកម្មវិធី Facebook / Facebook Home / Facebook Messenger នៅលើទូរស័ព្ទជាមុនសិន
សម្រាប់ SONY សូម Root ហើយប្រើ Root Explorer ចូលទៅកាន់ System/app រួចស្វែងរក
កម្មវិធី Facebook (facebook.apk) រួច Delete ចេញ បន្ទាប់មក Restart!
2. ទាញយក FB_Home.zip នៅទីនេះ រួចពន្លាតាម Winrar ឬ 7zip លោកអ្នកនឹងទទួលបាន File
ចំនួន 3 គឺ Facebook , Facebook Home និង Facebook Messenger រួចតម្លើងតាមធម្មតា!
3. បន្ទាប់ពីតម្លើងរួចសូមចុចលើ កម្មវិធី Facebook Home ដែលមាន ICON ឈ្មោះថា Home!
រួច Sign-in គណនី Facebook ចូល បន្ទាប់ពី Sign-in រួចចុចលើ Finish Setup អ្នកនឹងឃើញផ្ទាំង
អោយជ្រើសរើស Home ថ្មី ឬ Home ចាស់របស់អ្នក គ្រាន់តែចុចលើ Home ជាការស្រេច!
បញ្ជាក់: បើសិនត្រង់ចំនុចទី៣ មិនដំនើរការអ្នកត្រូវតែចូលទៅកាន់ ClockworkMod Recovery
ហើយ wipe dalvik cache (សម្រាប់ទូរស័ព្ទបានតម្លើង CWM)! តែបើសិនគ្មាន
ត្រូវ Wipe/Factory Data Reset សិនទើបតម្លើងសារឡើងវិញ!
Flashtool 0.9.10.2 Beta4 (Add Support Xperia ZL)
Download
Download
Mirror
មួយឈុតសម្រាប់ Samsung Galaxy S III Mini I8190 / I8190N / I8190L
ជាមួយ Samsung Galaxy S III Mini ToolKit មានមុខងារដូចជា:
- Install drivers automatically
- Backup/Restore a single package or all apps, user data and Internal Storage
- Backup your /data/media (virtual SD Card) to your PC for a Full Safe backup of data
- Perform a FULL NANDROID Backup of your system via adb and save in Custom Recovery format on your PC
- Pull /data and /system folders, compress to a .tar file and save to your PC
- Auto Update ToolKit to latest push version on startup (donator feature)
- Dump selected Phone Partitions, compress to a .zip file with md5 and save to your PC
- Install BusyBox binary on phone
- Root any public build INCLUDING JELLY BEAN (different options available)
- [B]Root with Superuser (ChainsDD) or SuperSU (Chainfire) via CWM (works on ANY build)
- Install any zip file via Sideload feature in Recovery
- Flash CWM Touch Recovery (thanks to clockworkmod team) or TWRP Recovery (thanks to twrp team)
- Rename Recovery Restore files if present
- Flash Insecure Boot Image for adb mode
- Flash Stock Boot Image back to your phone
- Create tar file to flash via Odin with 1-click process
- Download, Extract and Flash Stock Rom (full DETAILED steps) ESSENTIAL FOR WARRANTY RETURNS
- Rip cache.img to zip file in CWM format for editing and flashing (thanks to Adam Lange)
- Install a single apk or multiple apk's to your phone
- Push Files from your PC to your phone
- Pull Files from your phone to your PC
- Set Files Permissions on your phone
- Dump selected LogCat buffers to your PC
- Dump BugReport to your PC (if installed)
- Help, Information Screen for various tasks
- Mods Section to Modify your phone
- Reboot Phone options in adb mode
- Change background, text colour in ToolKit
- Activate Professional version and enable Donator features from within the ToolKit
មិនទទួលខុសត្រូវរាល់បញ្ហាដែលកើតឡើងណាមួយ! (Bricked)
Password: elunchen.com
ប្រភពពី: XDA-Developer៥ កម្មវិធីនឹងប្រែក្លាយទូរសព្ទរបស់អ្នកជាម៉ាស៊ីនស្កេន File PDF
១) CamScanner (10MB)៖
មិនត្រឹមតែថតហើយអាចបម្លែងឯកសារជា PDF បានភ្លាមៗនោះទេ
តែថែមទាំងមានមុខងារអាចកាត់តម្រឹមផ្ទៃឯកសារ
ឬក្រដាសស្នាមផ្សេងៗបានយ៉ាងស្អាតពេញជ្រុង។ វាអាចស្កេនជាឯកសារ
PDF បានច្រើនទំព័រជាប់គ្នា។ ពេលដែលបង្កើតជាឯកសារ PDF
រួចវាផ្ទុកនៅក្នុងទីតាំងមេម៉ូរីម៉ាស៊ីន ត្រង់ថតឯកសារឈ្មោះ “CamScanner“។
សូមចុចត្រង់នេះ …
២) Document Scanner (3.2MB)៖ មិនត្រឹមតែមានមុខងារបម្លែងជា PDF បាននោះទេ តែថែមទាំងអាចឱ្យគេ upload ចូលទៅ Google Docs, DropBox និង Box.net បានទៀតផង។ វាអាចស្កេនជាឯកសារ PDF បានច្រើនទំព័រជាប់គ្នា។ កម្មវិធីនេះក៏អាចឱ្យគេជ្រើសរើសប្រភេទក្រដាស និងកម្រិតគុណភាពរូបបានផងដែរ។
លក្ខណៈពិសេសទៀតនោះ Document Scanner អាចឱ្យយើងទាញយករូបពី Gallery មកធ្វើជាឯកសារ PDF ជាខ្សែ ឬយកមកផ្គុំបន្ថែមជាមួយកាមេរ៉ាថតរូបបានទៀតផង។ ក្រោយពីបម្លែងទៅជា PDF file រួចហើយវាមានទីតាំងនៅក្នុងមេម៉ូរីម៉ាស៊ីនក្នុងថតឯកសារឈ្មោះថា “document-scanner-files“។
សូមចុចត្រង់នេះ …
៣) Droid Scan Lite (ទំហំ 777KB)៖ មានលក្ខណៈដូចគ្នានឹងកម្មវិធីខាងលើ គឺអាចបម្លែងរូបភាពក្នុង Gallery និងរូបថតពីកាមេរ៉ាបានដូចគ្នា។ ឯកសារក្រោយពីបម្លែងរួចមានទីតាំងស្ថិតនៅមេម៉ូរីម៉ាស៊ីន ថតឯកសារឈ្មោះ “Droid Scan Extras“។
សូមចុចត្រង់នេះ …
៤) Scan to PDF (ទំហំ 1.2MB)៖ មុខងារ ដូចគ្នាដែរ គឺអាចថតរូបរួចបម្លែងជា PDF និងអាចយករូបភាពពី Gallery មកបម្លែងបាន។ ក្រោយពីបម្លែងរួច វាផ្ទុកនៅទីតាំងស្ថិតក្នុងមេម៉ូរីម៉ាស៊ីន និងមាននៅក្នុងថតឯកសារឈ្មោះថា “ScanToPDF_Free”។
សូមចុចត្រង់នេះ …
៥) ConvertToPDF Lite Version (ទំហំ 852KB)៖ មុខងារអាចស្កេនឯកសាររូបថតជា PDF និងបន្តគ្នាច្រើនទំព័របាន។ ក្រោយពីបម្លែងរួចហើយវាមានទីតាំងស្ថិតនៅមេម៉ូរីម៉ាស៊ីន និងនៅថតឯកសារ Android → data → br.com.tablet…converttopdf → file រួចមើលឈ្មោះឯកសារដែលយើងបានកំណត់។
សូមចុចត្រង់នេះ …
ប្រភពពី: Sabay.com.kh


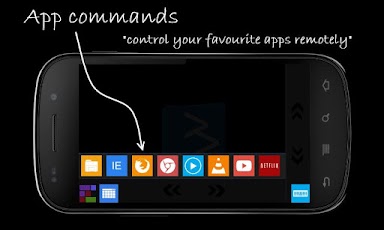

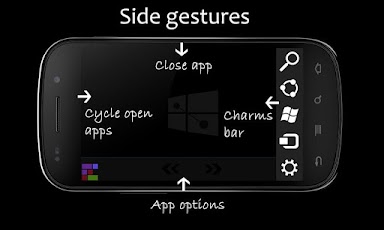
បញ្ជា Windows 8 ជាមួយឧបករណ៏ Android របស់អ្នក!
ឥលូវនេះលោកអ្នកអាចបញ្ជា Windows 8 របស់អ្នកដោយ ឧបករណ៏Android របស់អ្នកដោយផ្ទាល់
ជាមួយ Windows8Controller
ជាមួយ Windows8 Controller លោកអ្នកអាច:
- Multitouch gestures (pinch, stretch, swipe, rotate)
- Natural Scrolling Experience (Scroll horizontally and vertically as you scroll on a tablet)
- Use as a mouse (move, left/right/middle/double click, drag)
- Side gestures (Swipe from left/right/bottom/top to switch to next open app, show charms, show app options, close app respectively)
- App Commands (Remote controls for General use, Windows Media Player, VLC Player, IE, Firefox, Chrome, YouTube and Netflix player. More to come very soon)
- Tiles Screen (A tiles screen including most needed shortcuts like show start, show desktop, open computer and much more)
- Power Options (Don't you think it's not so easy to shut down the Windows 8? Not anymore. Windows 8 Controller includes power shortcuts. Shut down, restart, hibernate, sleep, lock, log off your computer with one tap)
- Volume Control (Do you need an easy way to adjust the volume of your Windows 8 PC? You've got it! Windows 8 Controller has a volume controller by which you can adjust/mute/unmute your computer's volume from your phone. Also you can use the hardware volume buttons of your phone)
- Virtual Keyboard (Type text by using your Android's keyboard. Take advantage of auto-complete feature of your keyboard or use swype keyboard. You can even type text to your computer by using voice-to-text feature of your Android phone's keyboard)
- Easily go back/forward (Tilt your phone left/right to go back/forward in your favourite web browser or file explorer)
- Four (or five) fingers pinch (to reveal start screen easily)
- With auto-connect and quick-connect features, it is very easy to connect your phone to your computer and start using Windows 8 Controller.
បញ្ជាក់: ត្រូវមាននៅលើ Android និង PC ទើបដំនើរការបាន!
របៀបបន្ថែម របារផ្លូវកាត់ (Status Bar) នៅលើ Sony Xperia
សម្រាប់ SONY ជំនាន់ Jelly Bean 4.1.2 ដូចជា: Xperia Z /ZL /E /J /T /V /TL សុទ្ធតែទទួលបាន
StatusBar ប្រភេទនេះ ដែលមានលក្ខណៈដូច Xperia Z!
តែសម្រាប់អ្នកប្រើប្រាស់ Xperia S /SL /Ion /P /Acro S ក៏អាចទទួលបានផងដែរ ដោយការ Root!
តម្រូវការ:
-ទូរស័ព្ទ Xperia (S /SL /Ion /P /Acro S) ដែលបានRooted រួច
-បានតម្លើង CWM រួច
បញ្ជាក់: មិនទទួលខុសត្រូវរាល់បញ្ហាដែលកើតមាន!
សូមជ្រើសរើស Style ចំនួន 6ខាងក្រោម រួច Install តាមរយៈ CWM ជាការស្រេច!
Style 1 (Download)
Style 2 (Download)
Style 3 (Download)
Style 4 (Download)
Style Z (Download)
Style S (Download)
ដកស្រង់ពី: XDA-Developer
[Rooted] ដំឡើង Xperia Z LockScreen នៅលើSONY Xperia P
Xperia Z ជាទូរស័ព្ទSmart Phone ដែល SONY ធ្វើឡើងមានលក្ខណៈប្លែកជាងទូរស័ព្ទដទៃទៀត
ជាពិសេសគឺ Lock Screen នេះហើយ!
ពេលនេះលោកអ្នកអាចដម្លើងលើ Sony Xperia P បានហើយដោយក្រុម XDA-Developer ជាអ្នក
អភិវឌ្ឍន៏ឡើង!
តម្រូវការ:
-Xperia P ដំនើរការដោយICS 4.0.4
-ត្រូវបានRooted រួចរាល់ (សូមរកវិធីRoot ដោយខ្លួនឯង)
-កម្មវិធីRoot Explore
ទាញយក:
របៀបដម្លើង:
បន្ទាប់ពីRooted រួចរាល់សូមដម្លើងRoot Explorer ចូល ហើយចម្លងFile Download (UxpNxtLockScreen.apk) ទៅកាន់ System/app តាមរយៈRoot Explorer បន្ទាប់មក Permissions
(Read /Read /Read /Write) ឬ (rw-r--r--)
ចុងក្រោយបិទបើកទូរស័ព្ទជាការស្រេច!
វិធី Root ឬ តម្លើងClockworkMod នៅលើSamsung Galaxy Note E160L (ICS + JB)
សម្រាប់តែ (ICS និង JB)
តម្រូវការ:
-CWM + Root Package (ទាញយកទីនេះ)
-Odin (ទាញយកទីនេះ)
របៀប:
ពន្លាFile ខាងលើទទួលបាន
-E160L CWM Recovery.tar
-SuperUser 3.2.zip
១.បើកOdin រួចជ្រើសយក PDA រើស E160 CWM Recovery.tar
ចូលDownload Mode (Vol- + Home + Power)
ចុចStart៕
២.ចម្លង SuperUser 3.2.zip ក្នុង Memory!
ចូលRecovery (Vol+ Vol- Power)
Install Zip From SDcard
Select From MemoryCard ឬ Internal Memory
រួចយក SuperUser 3.2.zip
Reboot!
[Download] Flashtool v.0.9.10.1
- Updated SuperSU to 0.98
- Updated translation system to almost all application frames (from there, people who want to contribute
  translation will be able to.
- Added a root package manager to easily reference and then choose which root package to install when
  rooting device.
- Reworked menus to be more clear (too much things into Tools menu)
Full install :
- Windows Edition - v0.9.10.1 (MD5 : F5F14804F28009E76F0A3F7B841FDCE8)
- Linux Edition - v0.9.10.0 (MD5 : AFD8D0AE0897093443B9DF2357CC009D)
- Mac Edition - v0.9.10.0 (MD5 : 6536C2A22D5917E0D8443953DCFB368A)
របៀបបង្កើតCustom Odin Package!
Below is a guide on how to Create your own custom ODIN packages.
You will need:
-Terminal emulator app
-linux computer or Cygwin for windows or shell command line
-ODIN program
-create folder on your external sd card named "backup"
-if you want backup to go on your internal SD card you will change the code line to mnt/sdcard/backup/.........
HOW TO:
- In the terminal emulator app on your phone enter the code line for the item you want a dump of and this code will make an image on your sdcard.
**NOTE** performing a system dump will take 5 minutes to execute as the system file is in the 1 to 1.5 gig range. BE PATIENT!!!
- Once you have the image files that you need then proceed to the shell command line below to package your ODIN bundle.
-You will want to copy all of these image files over to your computer for easier bundling from your command line.
SYSTEM
Code:
dd if=/dev/block/mmcblk0p14 of=/mnt/extSdCard/backup/mmcblk0p14_system.img bs=4096
Code:
dd if=/dev/block/mmcblk0p18 of=/mnt/extSdCard/backup/mmcblk0p18_recovery.img bs=4096
Code:
dd if=/dev/block/mmcblk0p15 of=/mnt/extSdCard/backup/mmcblk0p15_userdata.img bs=4096
Code:
dd if=/dev/block/mmcblk0p1 of=/mnt/extSdCard/backup/mmcblk0p1_modem.img bs=4096
Code:
dd if=/dev/block/mmcblk0p12 of=/mnt/extSdCard/backup/mmcblk0p12_modemst1.img bs=4096
Code:
dd if=/dev/block/mmcblk0p13 of=/mnt/extSdCard/backup/mmcblk0p13_modemst2.img bs=4096
Code:
dd if=/dev/block/mmcblk0p17 of=/mnt/extSdCard/backup/mmcblk0p17_cache.img bs=4096
Code:
dd if=/dev/block/mmcblk0p7 of=/mnt/extSdCard/backup/mmcblk0p7_boot.img bs=4096
How to package into a flashable ODIN package:
From a terminal command line:
Code:
tar -H ustar -c "INSERT_.IMG FILE HERE" mmcblk0p14_system.img > package_name.tar
md5sum -t package_name.tar >> package_name.tar
mv package_name.tar package_name.tar.md5
Make sure each .IMG file has a space between the next one.
DISCLAIMERS
1. I am not responsible if you brick your phone using these system dumps.
2. Do not monkey around with BOOT or MODEMS unless you are really sure what you are doing
3. Always make sure you package your ODIN bundles with a .Md5 checksum to prevent corrupted data dumps from screwing your phone up.
4. Stay away from flashing .tar only files as these will flash no matter what and have no error checking
5. If you plan to package ODIN bundles for distribution of your ROM, only package SYSTEM, RECOVERY, etc etc. Do not package USER DATA or CACHE for distrobution as this could contain your personal information. Only package CACHE and USER DATA if this is a personal backup or you know what you are doing.
6. Flashing ODIN packages without a samsung signature will increase your flash counter. The refurbishing companies that work with AT&T, Verizon, and T-mobile all use the same company in coppell TX and they do not check for the flash counter. Only Samsung does. Most phones are disassembled before they even go to Samsung and once the phone makes it there they bill the carrier back for the phone and not the customer. (Trust me, I run a warranty center for one of the big 4 carriers)
This comes directly from senior personnell from Samsung.
Sign APK និង Rom ជាមួយElunChen-Signer 1.2
រាល់ពេលដែលលោកអ្នកកែប្រែ APK ឬ ROM រួចរាល់គឺត្រូវSign រួចសិនទើបដាក់ចូល
ឧបករណ៏Android បាន!
ដូចនេះលោកអ្នកអាចសាកល្បងបានជាមួយTool ថ្មីនេះ!
លុបសញ្ញាត្រីកោណពណ័លឿង និង លុបFlash Counter លើSamsnug ជាមួយ[root] Triangle Away!
តំរូវការ:
-ទូរស័ព្ទដែលដំនើរការលើStock Rom!
-ទូរស័ព្ទដែលបានRooted រួច!
-កម្មវិធី [root] Triangle Away និង Param.tar
Model ដែលអាចលុបCounter និង Logo បានមាន:
Samsung Galaxy S2 GT-I9100 **
Samsung Galaxy Note GT-N7000 **
Samsung Galaxy Note GT-I9220 **
Samsung Galaxy S3 GT-I9300 **
Samsung Galaxy S3 GT-I9300T **
Samsung Galaxy S3 AT&T
Samsung Galaxy S3 Sprint
Samsung Galaxy S3 T-Mobile
Samsung Galaxy S3 Verizon
Samsung Galaxy S3 Canadia
Samsung Galaxy S3 US Cellular
Samsung Galaxy S3 GT-I9305 LTE **
Samsung Galaxy S3 GT-I9305T LTE **
Samsung Galaxy S3 GT-I9305N LTE **
Samsung Galaxy S3 Korea SHV-E210K/L/S ** DISABLE DUE TO ISSUES
Samsung Galaxy S3 Korea SHW-M440S **
Samsung Galaxy Note 2 GT-N7100 **
Samsung Galaxy Note 2 GT-N7105 LTE **
Samsung Galaxy Note 2 SPH-L900 Sprint **
Samsung Galaxy Note 2 SGH-T889 T-Mobile **
Samsung Galaxy Note 2 SGH-R950 US Cellular **
Samsung Galaxy Note 2 AT&T/Canada SGH-I317/M **
Samsung Galaxy Note 2 Korea SHV-E250K/L/S **
Samsung Galaxy Note 10.1" GT-N8000 3G **
Samsung Galaxy Note 10.1" GT-N801x Wi-Fi **
Samsung Galaxy Note 10.1" GT-N8020 LTE **
Samsung Galaxy Note 10.1" SHW-M480S/K/W **
Samsung Galaxy Tab 2 GT-P310x 7" 3G
Samsung Galaxy Tab 2 GT-P311x 7" Wi-Fi
Samsung Galaxy Tab 2 GT-P510x 10.1" 3G
Samsung Galaxy Tab 2 GT-P511x 10.1" Wi-Fi
ព្រមាន (Waring):
សូមមើលរបៀបធ្វើអោយបានច្បាស់មុននឹងលុបFlash Counter ឬ លុបLogo ពណ៍លឿងនេះអាចបណ្ដាលអោយទូរស័ព្ទលោកអ្នកBrickបាន!
បើសិនជាធ្ងន់ធ្ងរអាចធ្វើអោយខូចBoard ម៉ាស៊ីនតែម្ដង!
(បើសិនជាគ្មានបញ្ហាចាំបាច់ ឬ អាចប្រើបានធម្មតាមិនបាច់លុបនោះទេ)
អត្ថបទពីXDA-Developer ទាំងអស់មានដូចតទៅ (អាចចុចទីនេះមើលក៏បាន):
Many Samsung devices store a flash counter that keeps track of how many times you have flashed custom
firmwares to your device. On some devices, a yellow triangle or other
sort of visual warning is also displayed during boot if you are running a
custom firmware. TriangleAway was built to disable the
triangle (if a visual warning is present) and reset the custom ROM flash
counter to 0. This app requires root !
You can find out the current status of your flash counter and firmware state (custom or official) by booting into "download mode" on most devices. The usual way of getting into "download mode" is by first turning off your device, then turning it on by pressing and holding VolDown+(Home)+Power. Alternatively, the "adb reboot download" command also often works.
When you run TriangleAway, if your device and firmware are supported, it will show you the detected state of the binary (custom or official) and flash counter value, and the option to Reset flash counter. Please confirm that the information shown is correct before resetting the values.
On a number of devices, TriangleAway can work, but your firmware may not be supported directly. In that case, the app will tell you it needs to reboot into a special boot mode, which will be happen if you select Reset flash counter. The device will reboot into a special mode which will allow you to review the current status and reset the binary and flash counter values (or abort and do nothing). On some devices this will actually trigger the counter to 1 if its 0 - so if you're "just checking", do that in download mode!
THIS IS A DANGEROUS OPERATION AND COULD POTENTIALLY BRICK YOUR DEVICE. PROCEED AT YOUR OWN RISK. A USB JIG IS PREFERRED IF YOU HAVE A WORKING ONE.
( and by brick I mean brick - only a board replacement or a JTAG unit will be able to save you, don't mess with boot(loader) stuff unless you really mean it! )
Note#1: using Triangle Away may unmount your SD card. Reboot or manually remount it from Android settings.
Note#2: on new devices like the SGS3/SGNote2/SGNote10.1, the "system modified" status can only be reset on some firmwares - they must be stock firmwares!
FAQ
- Triangle Away shows a negative counter ?
If you have a very large flash count (over 127) this is known to happen. Please confirm in download mode that you actually have that large a flash count before resetting the counter.
- After using Triangle Away I get no bootscreen at all or an error message on screen ?
Try flashing the attached "param.tar" as PDA in ODIN (no repartition!), that may clear up the issue. Samsung Galaxy S II GT-I9100 ONLY
- What about future updats and devices ?
Please read this article I wrote about this: http://www.chainfire.eu/articles/118...ay_vs_Samsung/
- On my SGS3/Note2/etc, Download Mode says my System is modified, and Triangle Away does not reset it
Triangle Away attempt to reset this status and block it from coming back, but it depends on the firmware. It does work on some (not all) stock firmwares. Resetting this value doesn't work on custom firmwares!
- On the SGS3/Note2/etc, System->Settings->About device->Status still shows "Modified"
This is outside the scope of Triangle Away. The "system" status is not even always resettable in the bootloader. If you are going for warranty, you need to also reflash a full stock firmware and wipe your device. If they boot up your device and find root apps, you're not going to get any warranty anyway. If you do such a full stock reflash and wipe, the "Modified" value will go away.
Various Qualcomm-based Samsung devices should now be supported as well, but I don't know which ones - please let me know!
Suspected is a large range of Qualcomm based Note and S2 variants.
** Various related models are supported depending on firmware, but only the exact model numbers listed are supported regardless of firmware version.
Whether or not Triangle Away works depends largely on your kernel. Flashing a different kernel may make it work if it previously didn't.
Please also note that some devices set the counter to 1 at every boot if you are running a custom kernel or recovery. On these devices, Triangle Away may always display 1 - make sure to check the counter in actual download mode.
Download
Download from Google Play
The Google Play download is not free - it costs about a beer (thanks!). The download listed below is 100% the exact same program, but free. I provide it for free because I believe this app should be available even to people who cannot pay on Google Play. If you are able to purchase on Play, please consider that I have spent a great many hours on this, and the latest version also uses server resources I have to pay for.
REDISTRIBUTION IS NOT ALLOWED
( 1.00: 634; 1.10: 12795; 1.25: 59699; 1.50: 2891; 1.51: 45740; 1.70: 30839; 1.80: 13997; 1.90: 26020; 2.00: 10141; 2.05: 2421; 2.06: 755; 2.10: 17703; 2.15: 4780; 2.20: 4219; 2.25: 2861; 2.26: 11340; 2.30: 5132; 2.35: 676; 2.376: 16139 )
របៀបConvert File Image (.img) ទៅកាន់ (.tar) (.md5) សំរាប់Flash ជាមួយOdin
និយាយដល់File (.img) គឺច្បាស់ជានឹកឃើញដល់ClockworkMod មុនគេព្រោះCWM នីមួយៗ
ភាគច្រើនជាFile (.img) ប្រភេទនេះដែលអាចទាញយកពីClockworkMod.com!
ហើយសំរាប់HTC Sony បើចង់Flash File នេះចូលគឺត្រូវFlash តាមFastboot ហើយទូរស័ព្ទនោះក៏
ត្រូវUnlock Bootloader ដែរទើបអាចFlash បាន!
តែចំពោះSamsung វិញគឺគ្មានFastboot ទេគឺត្រូវConvert File (.img) នេះចូលទៅជាFile .md5 ឬ .tar
រួចទើបFlash តាមodin!
ដើម្បីConvert បានមានតែប្រព័ន្ធប្រតិបត្តិការLinux ប៉ុណ្ណោះដែលមានBox Commands ស្រាប់ (Ubuntu)!
ចំពោះWindows សូមប្រើកម្មវិធី Cygwin
របៀបធ្វើ(Linux):
1.ទាញយក File .img មួយសំរាប់ទូរស័ព្ទលោកអ្នក!
2.Rename ទៅ Recovery.img
3.ចូលទៅប្រអប់commands: របស់Linux រូចវាយ
tar -H ustar -c recovery.img > recovery.tar

md5sum -t recovery.tar >> recovery.tar

mv recovery.tar recovery.tar.md5
របៀបធ្វើ(Windows)
1) Navigate to your cygwin directory (ex: C:\cygwin) and go to C:\YOUR_CYGWIN_DIRCECTORY\home\Owner\ and create a folder, name it to whatever you'd like (ex: recovery_odin)
2) Download your CWM recovery image and rename it to recovery.img. Place it in the folder you created in cygwin (for the rest of the guide I'll refeer to this folder as recovery_odin)
3) Double click on your cygwin.bat and type this:
Code:
cd recovery_odin
Code:
$ tar -H ustar -c recovery.img > recovery.tar
$ md5sum -t recovery.tar >> recovery.tar
$ mv recovery.tar recovery.tar.md5
របៀបបង្កើតFirmware Samsung សំរាប់ប្រើលើODIN!
BEFORE YOU START, YOU WILL NEED:
- Windows & Relevant ODIN drivers (note – if you’re on 64 bit, you will need to run ODIN as administrator for it to work)
- A Linux installation (VM, cygwin will suffice)
So... Working on ODIN roms is a little different to typical ROM cooking.
1. First, flash the base ROM via ODIN. These can generally be obtained from Samfirmware.com (so, for the purpose of this example, I used a leaked, 90% working FROYO build for the Vibrant).
2. ROOT the phone using SuperOneClick or your preferred method.
3. Once you’ve found any ROM issues, fix - or make any changes to the build.
4. Add custom boot, build.prop, sounds, fonts, whatever you want. Literally, build your ROM live on the phone. You can pull the whole system directory, de-odex it, make changes to individual APKs using APKTOOL, and then push them back to the phone. To do so, you will need to mount system as read write. Do that by typing the following:
adb shell
su
mount -o rw,remount /dev/block/stl9 /system
5. Once you’re happy with the build, it’s time to dump the necessary partitions to build the ODIN rom.
To do this, ensure the phone is rooted and use adb. Let’s work on the assumption that if you’re reading this, you know what you’re doing with adb.
adb shell
su
In terminal/command prompt, type the following commands to dump the /system partition, zImage (kernel) and modem.bin (radio) to the INTERNAL SD Card:
NOTE - YOU DO NOT NEED TO PULL KERNEL/MODEM IF YOU ALREADY HAVE THESE FROM AN OFFICIAL BUILD. JUST PULL SYSTEM. TO LOCATE THE DIFFERENT PARTITIONS, USE:
cat /proc/mounts
You will see that system is on STL9, and DBDATA is on STL10, for example, on a Galaxy S. I believe on the Galaxy Ace, system is on STL12.
Below are the commands to dump the images:
su
dd if=/dev/block/stl9 of=/sdcard/factoryfs.rfs bs=4096
dd if=/dev/block/bml7 of=/sdcard/zImage bs=4096
dd if=/dev/block/bml12 of=/sdcard/modem.bin bs=4096
6. You’ll need to boot into your Linux machine/VM and boot the . The next step is to create the tarball of the dumped partitions. Do this by typing the following command into the Linux terminal:
tar -H ustar -c factoryfs.rfs modem.bin zImage > vibrant.tar
NOTE - YOU CAN ADD data.rfs , dbdata.rfs - anything you like.
7. Next, we need to md5 it up, as ODIN checks the md5 before writing the image. Do this with the following command:
md5sum –t vibrant.tar >> vibrant.tar
mv vibrant.tar vibrant.tar.md5
8. Contratulations! That’s your ODIN flashable ROM.
9. You will NOT need a PIT file in ODIN to flash this ROM. If, however you totally screwed up your ROM and it needs to be re-partitioned, you will need it. This can be obtained by Googling for it, or by pulling your own. Type this into terminal emulator:
su
dd if=/dev/block/bml2 of=/sdcard/FILENAME.pit bs=4096
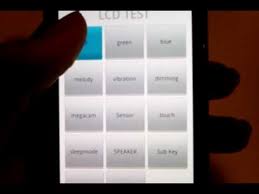
(Android Service Test Code] លេខកូដសំងាត់ផ្សេងៗរបស់Samsung ដំនើរការដោយAndroid
- *#*#4636#*#* - Phone Information
- *2767*3855# - Hard Reset
- *#*#7780#*#* - Factory Reset
- *#*#7594#*#* - Change End Call/Power Option
- *#*#197328640#*#* - Service Mode
- *#*#273283*255*663282*#*#* - File Copy Screen (Backup Media Files)
- *#*#526#*#* - WLAN Test
- *#*#232338#*#* - Shows WiFi MAC address
- *#*#1472365#*#* - GPS Test
- *#*#1575#*#* - Another GPS test
- *#*#232331#*#* - Bluetooth test
- *#*#232337#*# - Shows Bluetooth device address
- *#*#8255#*#* - GTalk Service Monitor
TEST MODE CODE:
- *#*#0283#*#* - Packet Loopback
- *#*#0*#*#* - LCD test
- *#*#0673#*#* - Melody test
- *#*#0842#*#* - Device test (Vibration test and BackLight test)
- *#*#2663#*#* - Touch screen version
- *#*#2664#*#* - Touch screen test
- *#*#0588#*#* - Proximity sensor test
- *#*#3264#*#* - RAM version
របៀបតម្លើង Touch Recovery ចូលក្នុង HTC One X
Recovery ជាកន្លែងដែលបង្ករលក្ខណៈងាយស្រួលដល់យើងក្នុងការ flash ROM ផ្សេងៗនិងធ្វើកាងារជាច្រើនទៀតដែលអាចឲ្យយើងសង្គ្រោះទូរស័ព្ទនៅពេលដែលមានបញ្ហាផ្សេងដែលមិនអាចចូលទៅក្នុង system បានដូចធម្មតា។reovery ត្រូវបានគេcompile មកមានច្រើនបែបច្រើនសណ្ឋានណាស់នាពេលបច្ចុប្បន្ននេះ គឺមានទាំងប្រើ touch និង vol សំរាប់បញ្ជាហើយនិងមាន UI ខុសៗទៀតផង។ សំរាប់ពេលនេះខ្ញុំសូមណែនាំពី recovery របស់ HTC One X សំរាប់មិត្តអ្នកអានដែលចូលចិត្តសាកល្បងប្រើប្រាស់ ROM ផ្សេងៗតាមចំនង់ចំនូលចិត្ត។ ដើម្បីតម្លើង recovery នោះចាំបាច់ត្រូវធ្វើតាមលំណែនាំខាងក្រោម៖
- តម្លើងកម្មវិធី HTC Sync ដើម្បីតម្លើង driver
- ចាំបាច់ត្រូវតែ unlock bootloader ជាមុនសិនសឹមមើលដំនើរបន្ទាប់ទៀត
- បើក unknown source នៅក្នុង security setting
- បើក USB Debugging នៅលើ developer option
- ទាញយក flash touch recovery.zip
- ពន្លាវាដាក់ចូលក្នុងថតណាមួយ
- ដំនើរការឯកសារដែលមានឈ្មោះថា install-recovery.bat រួចធ្វើតាមការណែនាំជាការស្រេច!

របៀបជួសជុល USB internet tethering សំរាប់ Android
របៀបជួសជុល USB internet tethering សំរាប់ Android
នៅពេលដែលលោកអ្នកប្រើ internet tethering តាមរយះ USB នោះអ្នកនឹងអាចជួបបញ្ហា error បណ្តាលអោយ internet connection នៅលើ computer ដាច់ជាញឹកញាប់រហូតធ្វើអោយអ្នកដោត USB ម្តងទៀត បញ្ហានេះកើតឡើងដោយការមិនស៊ីសង្វាក់គ្នារវាង Device Driver និង PC Operating System ដែលនៅមានភាពចន្លោះប្រហោង មិនដូចជា iDevice ដែលមានលក្ខណះល្អប្រសើរជាង ។
ដើម្បីធ្វើការជួសជុលបញ្ហាខាងលើនេះ យើងត្រូវប្រើកម្មវិធីជំនួយដែលមានឈ្មោះថា PdaNetអ្វីដែលអ្នកត្រូវធ្វើគឺធ្វើការ install PdaNet ទាំងនៅលើ Android និង នៅលើ PC
វិធីសាស្រ្ត
ទីបំផុតអ្នកអាចចូលទៅកាន់ PdaNet នៅលើ Android ដើម្បីជ្រើសយក USB tethering និងសង្ឃឹមមិនមានបញ្ហា error នេះទៀតទេ ។
ប្រភពពី: Facebook Group
នៅពេលដែលលោកអ្នកប្រើ internet tethering តាមរយះ USB នោះអ្នកនឹងអាចជួបបញ្ហា error បណ្តាលអោយ internet connection នៅលើ computer ដាច់ជាញឹកញាប់រហូតធ្វើអោយអ្នកដោត USB ម្តងទៀត បញ្ហានេះកើតឡើងដោយការមិនស៊ីសង្វាក់គ្នារវាង Device Driver និង PC Operating System ដែលនៅមានភាពចន្លោះប្រហោង មិនដូចជា iDevice ដែលមានលក្ខណះល្អប្រសើរជាង ។
ដើម្បីធ្វើការជួសជុលបញ្ហាខាងលើនេះ យើងត្រូវប្រើកម្មវិធីជំនួយដែលមានឈ្មោះថា PdaNetអ្វីដែលអ្នកត្រូវធ្វើគឺធ្វើការ install PdaNet ទាំងនៅលើ Android និង នៅលើ PC
វិធីសាស្រ្ត
- Android Device: Play Store> PdaNet3.50 > Install
- PC: http://junefabrics.com/android/download.php download រួចបើកវាដើម្បីតំឡើង ។ ក្នុងពេលតំឡើងវានឹងសួរយើងថាតើdevice មួយណាដែលអ្នកចង់ដំឡើង បើសិនជាមិនមានឈ្មោះdevice របស់អ្នកទេ អ្នកត្រូវជ្រើសយក Other ដើម្បី install
ទីបំផុតអ្នកអាចចូលទៅកាន់ PdaNet នៅលើ Android ដើម្បីជ្រើសយក USB tethering និងសង្ឃឹមមិនមានបញ្ហា error នេះទៀតទេ ។
ប្រភពពី: Facebook Group
- សរសេរដោយ Jay Rong
- Admin https://www.facebook.com/groups/idroidwin.khmeruser
25 September 2012
Install Khmer Unicode on Galaxy S GT-I9000 on ICS 4.0.4 and Jelly Bean 4.1.1
By Jay Rong in Android Heart [ ខ្មែរជួយខ្មែរ ]
First you need to update your Device to 4.0.4 or Jelly Bean 4.1.1. Please follow this link
http://www.elunchen.com/2012/09/upgrade-samsung-galaxy-s-gt-i9000-to.html
អ្វីដែលអ្នកត្រូវការគឺ
- Font Khmer: nks_ics_kh_v1 http://www.mediafire.com/?sls0y1f0gt5y071
- ទូរស័ព្ទ SGS GT-I9000 ដែលUpdate ទៅ ICS ឬ Jelly Bean រួចរាល់
មុននឹងធ្វើអ្នកត្រូវចំលង nks_ics_kh_v1.zip ទៅក្នុង Internal SDcard ជាមុនសិន (អ្នកអាចចំលងទៅ External ក៏បាន)
- ជំហ៊ានទី១: ត្រូវ Boot ចូល Recovery Mode :ដោយអ្នកត្រូវ Press and Hold Volume-Up Button + Power Button + Home Button
- ជ្រើសរើស Install zip from sdcard > Choose zip from internal sdcard ស្វែងរក nks_ics_kh_v1.zip និងជ្រើសរើស Yes - Install nks_ics_kh_v1.zip
- ត្រឡប់ទៅកាន់ reboot វិញដោយជ្រើសរើស ++++Go Back++++ និងធ្វើការ Reboot ម៉ាស៊ីនជាការស្រេច ។
- Setting > Language and input >Tick Multiling Keyboard និង Set Multiling Keybaord ដោយ ចូលទៅកាន់ Language > tick ភាសាខ្មែរ និង អង់គ្លេស ។
- បន្ទាប់មក Back មកកាន់ Language and Input ជ្រើសរើាសយក Default > ជ្រើស Multiling Keyboard ។****នៅពេលនេះអាចរីករាយជាមួយនឹងភាសាខ្មែររបស់អ្នកបានដោយជោគជ័យ****
ដោយ:Jay Rong
No comments:
Post a Comment